The Best Fluffy Pancakes recipe you will fall in love with. Full of tips and tricks to help you make the best pancakes.



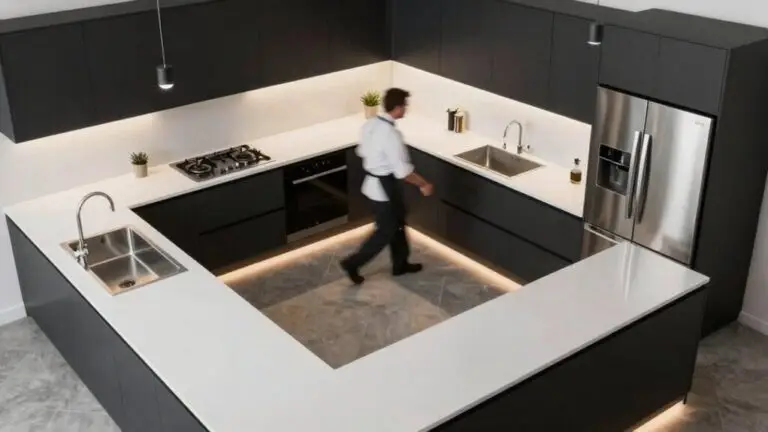
You’ll start by mapping your kitchen zones—pantry, prep, sink, range—so your workflow follows a natural path without crossing your own feet. Keep each leg of your work triangle between 4 and 9 feet for efficiency.
Next, add hands-free tools like motion-sensor faucets and drawer-based storage to cut clutter.
Finally, verify your 42–48-inch walk space, lighting, and waste access before finalizing cabinets. Stick around—there’s more to get that flawless plan locked in.
Step 1: Map Your Kitchen Zones for an Effortless Workflow
Before you start picking out cabinets or countertops, take a step back and map your kitchen’s workflow. Divide your kitchen into clear zones: pantry, sink, counter, and range. That’s your modern work triangle.
Before picking cabinets, map your kitchen’s workflow into zones: pantry, sink, counter, range—your modern work triangle.
Good kitchen design means every detail serves a purpose. Plan layout planning so items move from pantry to prep to sink to range without crossing paths. That streamlined workflow saves you steps and sanity. Leave 42–48 inches of walk space for two cooks: it’s worth it.
Within each zone, place your most-used tools right where you reach for them. This makes temporary kitchen setups feel permanent. Use zone mapping to decide where to put lighting and outlets, like under-cabinet lights over your prep counter.
Just don’t finalize plumbing or electrical until your zones feel natural. Storage solutions come next, but the flow comes first. According to NKBA kitchen planning guidelines, each leg of the work triangle should measure between 4 and 9 feet, with a total perimeter kept between 13 and 26 feet.
Step 2: Build a Faster Workflow With Drawers and Hands-Free Tools
Add hands-free helpers to reduce interruptions. Install a motion-sensor faucet with instant hot water, and tuck a touch-to-open trash drawer near the prep area—no bending or reaching.
Keep counters clear by hiding chargers inside drawer fronts.
Use wall-mounted rail-and-hooks storage to hang pans where they are grabbed fastest, freeing up cabinet space for less-used items.
During Kitchen Remodeling, build a detailed plan to Choose Materials like durable glides.
Follow this planning step to ensure your appliances and materials work together.
You’ll transform your kitchen into something both functional and beautiful.
Step 3: Verify Your Workflow With Lighting, Waste Access, and Walk Space
Once you’ve planned your drawer workflow and hands-free helpers, it’s time to verify everything actually works together.
Start with walk space: aim for 42–48 inches so two cooks don’t bump into each other.
Next, check lighting coverage. Install LED puck or tape lights under cabinets to banish shadows over prep zones, and make sure sink and cooktop lighting is bright and reachable.
For waste access, place your trash pull-out system on the shortest path away from major circulation routes.
Make sure your counter-to-sink-to-cooktop workflow stays easy by confirming drawers and doors clearance—no collisions between waste bins and appliance handles.
Before finalizing your layout, tools like browser-based 3D planners let you walk through your design virtually to catch lighting gaps and clearance conflicts before demo day.
That way, your kitchen runs like a well-oiled machine.
Final Thoughts
So, you’ve got your zones mapped, your drawers gliding, and your lights dialed in. That’s the blueprint for a kitchen that actually works with you, not against you.
Now, step back and take a deep breath. Your plan’s solid. You’re trading chaos for calm, and that’s no small feat. A few smart choices today buy you years of easy cooking and happy mornings.
Go ahead, pour yourself a coffee. You’ve earned that flawless workflow.