The Best Fluffy Pancakes recipe you will fall in love with. Full of tips and tricks to help you make the best pancakes.


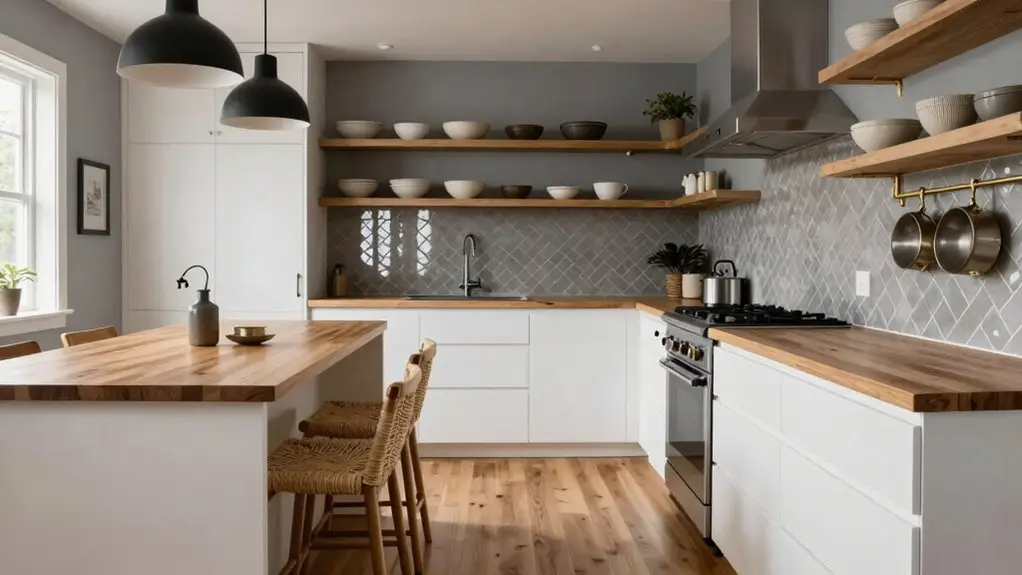
You’ve got seven solid layout options to transform your cramped kitchen into a space that actually works for you. Go galley if you’re dealing with a narrow passage, or pick an L-shape to open up the center and keep your work triangle tight.
A U-shape piles on storage without eating your walkway, while a one-wall setup keeps studio apartments feeling airy. Add an open peninsula for instant prep space and sight lines, or squeeze in a slim island if traffic allows.
Got weird angles? Mix two layouts together. Each choice comes with smart tweaks to make your small kitchen feel bigger than it really is, and you’ll find the details that make them click just ahead.
Choose a Galley Layout for Narrow Small Kitchens
If you’re working with a long, narrow kitchen that’s short on square footage, a galley layout might just be your new best friend. Galley kitchens pack serious efficiency into tight spaces, and you’ll wonder why you ever considered anything else for your small kitchen layout.
You’ll place cabinetry and appliances on two parallel walls, creating a streamlined aisle that keeps everything within arm’s reach.
To nail the work triangle, position your sink, stove, and refrigerator so you’re not marathon walking between prep, cooking, and cleanup. It’s simple, really.
To maximize space, install full-height cabinets along both runs.
Want breathing room? Swap upper cabinets for open shelving on one side.
Your small galley kitchen will feel instantly airier.
Choose slim appliances too, so you’re not squeezing past your own fridge.
Light colors? Absolutely—they’ll widen that narrow passage beautifully.
If you’re updating your galley kitchen floor, start your tile installation from the center of the room and snap intersecting chalk lines to keep your layout perfectly aligned from the start.
Select an L-Shaped Layout to Open Up Your Small Kitchen
You’ll want to think an L-shaped layout if you’re craving more breathing room, since it hugs two walls and leaves the center wide open for dancing or at least for not bumping elbows.
This setup lets you work smarter, not harder, by clustering your sink, stove, and fridge into a tight triangle that saves steps while you’re juggling dinner.
You’ll also squeeze every inch out of those tricky corners and keep traffic flowing seamlessly.
As a result, your tiny kitchen feels surprisingly functional and far less like a closet.
To finish the look without a lengthy renovation, consider adding peel-and-stick backsplash tiles along the exposed walls, since they install without grout or special tools and can be trimmed with a utility knife to fit any angle.
Corner Space Utilization
Because every inch counts in a tight kitchen, corner space isn’t something you can afford to waste. When you’re exploring small kitchen design ideas, you’ll quickly see why the L-shaped corner layout shines.
By running counters along two adjacent walls, you turn that awkward corner into your main storage hub.
You’ll want to install corner-specific cabinetry, like lazy Susans or pull-out drawers, so you don’t lose anything in the black hole of a standard cabinet.
Tuck your sink along one leg, ideally near a window for natural light, and it keeps your prep-to-cleaning flow effortless.
Keep the outer edge clear for walking, and consider lighter cabinet fronts or open shelving on one side.
It opens up the room visually, so your small kitchen feels bigger than its footprint.
Pairing your L-shaped layout with a luxury pantry organization system keeps your dry goods, spices, and small appliances neatly consolidated so your limited counter space stays clear and functional.
Work Triangle Efficiency
That smart corner setup sets the stage, but now let’s talk about how you’ll actually move around in this space.
Your L-shaped small kitchen naturally supports work triangle efficiency. You’re keeping the sink, cooktop, and refrigerator within easy reach without feeling cramped.
You’ll want the sink on your main run, ideally catching some natural light for washing and prep.
Tuck the refrigerator at one end of the L, maybe near where you walk in, so grabbing milk doesn’t send you zigzagging through someone else’s cooking zone.
Place your cooktop on the other leg, completing those short clear paths between fridge, sink, and stove.
No marathon laps required! With an L-layout, you’re basically spinning on your heel to move between tasks. It’s compact, intuitive, and keeps your kitchen feeling open rather than obstacle-course chaotic.
Adding kitchen storage cabinet organizers inside your L-shaped cabinets helps you maximize every inch of corner and wall space without adding visual clutter to the room.
Open Floor Integration
In an L-shaped layout, you’re basically hugging two walls and giving the middle of your kitchen room to breathe. It’s one of those design solutions that just clicks: you get cabinets and counters where you need them, but you don’t feel trapped.
To nail the open plan vibe, run the same flooring from your kitchen straight into your living or dining area. This simple trick changes the whole look and feel, making the space flow instead of fight. For a seamless and budget-friendly way to achieve this, peel-and-stick vinyl planks are 100% waterproof and can be installed without professional help, making them ideal for extending your kitchen floor into adjoining rooms.
Position your sink on that main L-wall, ideally under a window if you’ve got one. You’ll fill your space with light while keeping sightlines clear to the rest of your home.
Swap some uppers for open shelves to make your kitchen look taller and brighter. Food tastes better without walls closing in on you.
Maximize Storage in a Compact U-Shaped Kitchen
If you’re stuck with a tiny U-shaped kitchen, you’re probably tired of bumping elbows with your spice rack.
A thoughtful design turns your compact kitchen into a storage powerhouse without cramping your style.
Run your cabinetry straight to the ceiling.
You’ll grab serious vertical storage space while keeping the floor plan open.
Tuck full-height fridge and pantry units into corners; they swallow groceries without narrowing your walkway.
Slide tall, shallow pull-outs along the U legs to stash dry goods, freeing up counter space for actual cooking.
Swap one side’s bulky uppers for open shelves or glass-front doors.
Lightened storage keeps small spaces feeling airy, not boxed-in.
Add toe-kick drawers and under-counter spice pull-outs so necessities hide within arm’s reach.
Your triangle flows, and you cook happier.
For a more polished and efficient approach, a luxury closet organization system can be adapted to kitchen cabinetry, bringing customized compartments and refined hardware that maximize every inch of available space.
Extend a Small Kitchen Visually With an Open Peninsula

You can stretch a cramped kitchen without knocking down walls by swapping a bulky island for an open peninsula that keeps your sightlines clear into the next room.
This layout gives you the bonus of a multi-functional spot—think morning coffee bar, homework station, or extra prep area—without boxing you in.
It’s a smart trick that feels almost like cheating the square footage gods.
Your space will thank you for it.
When tiling the peninsula’s base or backsplash, using tile leveling spacers helps ensure a flush, professional finish by preventing lippage between tiles during installation.
Peninsula Layout Benefits
Because a cramped kitchen doesn’t have to feel like a shoebox, an open peninsula can work wonders when you’re short on square footage. You extend your main counter into the room, creating instant prep space without blocking the flow.
This trick makes the space feel airy and connected, not cut off.
Position your open peninsula with about 36 inches of walkway, and you’ll keep traffic moving effortlessly.
You can park one work zone there—maybe chopping veggies while pots simmer on the main wall—cutting down your steps.
Choose light cabinetry or open shelving on the outer face, and you’ll keep that breezy vibe going.
Add a slim overhang for stools or pull-out storage, and you’ve got smart small kitchen ideas that actually fit your compact space. If you’re updating the walls too, budget subway tiles cost as little as $1–5 per square foot and can give your peninsula backdrop a polished, high-end look without stretching your renovation budget.
Open Sight Lines
Three solid walls can turn even a decent-sized kitchen into a claustrophobic cave. You’ll fix this with smart design ideas that create open sight lines throughout your space.
Add an open peninsula instead of boxing yourself in. You’ll keep that precious look through to your living area, and your kitchen instantly appears larger. It’s like magic, but it’s just thoughtful planning.
Stick with a slim profile so you’re not squeezing past it. Match your finishes to the main cabinetry—think light, bright, and reflective. You’ll bounce light around and keep things airy.
PLACE EVERYDAY ITEMS ON A SINGLE DISPLAY SHELF RATHER THAN CROWDING OVERHEAD. YOU’LL MAINTAIN THAT OPENNESS WHILE STAYING PRACTICAL. Your work triangle stays tight, your sight lines stay clear, and your small kitchen feels like breathing room. When updating your peninsula cabinetry, choose handles with a slim matte black profile to keep the look streamlined and visually uncluttered.
Multi-Function Peninsula
When space is tight, you’ll want every inch to pull its weight, so an open peninsula becomes your secret weapon. A multi-function peninsula stretches your small kitchens into the dining space without blocking traffic, giving you that “floating” feel that opens everything up.
Here’s how you nail it: Design one side for prep with drawers and storage, flip it for bar-height seating on the other. Match your finishes to the main run—same counters, same cabinet color—so your eye travels straight through.
Layer in lighting, maybe a slim pendant, so it feels like a real zone, not an afterthought. Tuck backless stools underneath, and you’ve got creative solutions that actually work.
For the backsplash behind your peninsula, peel-and-stick subway tiles let you skip the grout and mortar entirely, cutting down your DIY install time without sacrificing a polished look.
These smart kitchen designs prove you don’t need square footage to cook, eat, and live well. It’s practical magic.
Add a Peninsula or Slim Island That Keeps Traffic Moving
If you’re tired of bumping hips with whoever’s rummaging in the fridge, a peninsula or slim island might just save your sanity and your toes.
In small kitchens, adding a peninsula or slim island gives you extra prep space without widening the main aisle. Aim for clear traffic paths of roughly 36 inches so you’re not doing an awkward dance every time someone walks through. In a galley layout, this addition becomes a natural focal point that doesn’t block natural light or sightlines.
Keep your island around 24–30 inches deep so both sides stay usable for chopping and staging dishes.
Use rounded corners to prevent bruised hips.
Consider putting it on casters so you can roll it aside when you’re hosting.
Choose open base shelving and materials matching your countertops to keep things visually light.
You’ll gain function without creating a traffic jam.
Choose a One-Wall Kitchen Layout for Studio Apartments
Because every square foot counts when you’re living in a studio, a one-wall kitchen layout lets you cook without sacrificing your living space. You’ll find everything along one wall: the sink, cooktop, and counter—so the rest of your studio apartment stays open for sleeping, lounging, or working.
Tuck the sink under a window if you can, and keep your prep area right there so you’re not dancing around a cramped aisle.
Slide a counter-depth fridge to one end to keep your workspace continuous.
Floor-to-ceiling full-height cabinets squeeze every bit of storage from your small space without looking cluttered.
Pick integrated appliances, like a slim cooktop or combo oven, to free up counter room.
This setup adapts, giving you space when needed while keeping your kitchen functional and your studio feeling wonderfully open.
Combine Two Layouts for Irregular Room Shapes

Not every kitchen plays by the rules, and that’s okay: you’ve got to work with what you’ve got. When you’re dealing with irregular rooms, don’t force one standard layout. Instead, combine two layouts to turn awkward angles into functional zones.
Try pairing a galley section with an L-shaped end run. You’ll keep a steady work triangle along the main corridor while scoring extra counter space in that tricky corner. Or take a U-shaped base across three walls, then break it with a perpendicular leg to widen a narrow pinch point. This is genius kitchen inspiration for tight spots.
For sharp corners, wrap cabinets around as an L-shaped run perpendicular to your main cooking wall. Center your sink on the longest stretch. Use ceiling-height storage and light cabinetry so the changeover feels seamless, not choppy.
Final Thoughts
Finding Your Perfect Small Kitchen Layout****
You’ve got options, seven of them, actually. Whether you’re squeezing into a studio apartment or opening up a cramped galley, the right layout changes everything. Galley kitchens keep traffic moving. L-shapes give you that coveted counter space without eating up your floor plan. Don’t overlook the peninsula; it doubles as a breakfast bar and extra prep area.
HERE’S THE THING: SMALL DOESN’T MEAN SETTLING. IT MEANS GETTING CREATIVE WITH EVERY SQUARE INCH. Combine layouts, add strategic storage, and suddenly your kitchen works harder than you do (in a good way).
Which layout speaks to you?